donderdag 25 november 2021

Vagrant: mapping a Virtualbox VM to a Vagrant environment

Via Martin's Blog by Martin Bach

ef5fa3199a324585218a2d8daa686248?s=200&t

This is a small post hopefully saving you a few minutes mapping Vagrant and VirtualBox environments.

I typically have lots of Vagrant environments defined. I love Vagrant as a technology, it makes it super easy to spin up Virtual Machines (VMs) and learn about new technologies.

Said Vagrant environments obviously show up as VMs in VirtualBox. To make it more interesting I have a few more VirtualBox VMs that don't map to a Vagrant environment. Adding in a naming convention that's been growing organically over time I occasionally find myself at a loss as to which VirtualBox VM maps to a Vagrant environment. Can this be done? Yep, and creating a mapping is quite simple actually. Here is what I found useful.

Directory structure

My Vagrant directory structure is quite simple: I defined ${HOME}/vagrant as top-level directory with a sub-directory containing all my (custom) boxes. Apart from ~/vagrant/boxes I create further sub-directories for each project. For example:

[martin@ryzen: vagrant]$ ls -ld *oracle* boxes    drwxrwxr-x 2 martin martin 4096 Nov 23 16:52 boxes    drwxrwxr-x 3 martin martin   41 Feb 16  2021 oracle_19c_dg    drwxrwxr-x 3 martin martin   41 Nov 19  2020 oracle_19c_ol7    drwxrwxr-x 3 martin martin   41 Jan  6  2021 oracle_19c_ol8    drwxrwxr-x 3 martin martin   41 Nov 25 12:54 oracle_xe

But … which of my VirtualBox VMs belongs to the oracle_xe environment?

Mapping a Vagrant environment to a VirtualBox VM

Vagrant keeps a lot of metadata in the project's .vagrant directory. Continuing with the oracle_xe example, here is what it stores:

[martin@buildhost: oracle_xe]$ tree .vagrant/    vagrant/    ├── machines    │   └── oraclexe    │       └── virtualbox    │           ├── action_provision    │           ├── action_set_name    │           ├── box_meta    │           ├── creator_uid    │           ├── id    │           ├── index_uuid    │           ├── synced_folders    │           └── vagrant_cwd    ├── provisioners    │   └── ansible    │       └── inventory    │           └── vagrant_ansible_inventory    └── rgloader        └── loader.rb        7 directories, 10 files

Looking at the above output I guess I should look at .vagrant/machines/

The machine name (oraclexe) is derived from the Vagrantfile. I create a config.vm.define section per VM out of habit (even when I create just 1 VM), as you can see here in my shortened Vagrantfile:

# -*- mode: ruby -*-    # vi: set ft=ruby :        Vagrant.configure("2") do |config|            config.vm.define "oraclexe" do |xe|        xe.vm.box = "ol7"        xe.vm.box_url = "file:///home/martin/vagrant/boxes/ol7.json"            ...            xe.vm.provision "ansible" do |ansible|          ansible.playbook = "setup.yml"        end      end    end

In case you don't give your VMs a name you should find a directory named default instead.

As I'm using Vagrant together with VirtualBox I'm not surprised to find a sub-directory named virtualbox.

Finally! You see the VM's metadata in that directory. The VM's ID can be found in .vagrant/machines/oraclexe/virtualbox/id. The file contains the internal ID VirtualBox uses to identify VMs. Using that knowledge to my advantage I can create the lookup as shown here:

[martin@buildhost: oracle_xe]$ vboxmanage list vms | grep $(cat .vagrant/machines/oraclexe/virtualbox/id)    "oraclexe" {67031773-bad9-4325-937b-e471d02a56a3}

Voila! This wasn't particularly hard since the VM name is oracelxe as well. Nevertheless I found this technique works well regardless of how you curated your Vagrantfile.

Happy Automating!

New article matched for in your Blogger! rule

Testing Wide Production 2020

maandag 22 november 2021

K-Meleon Portable 76.4.5-2021-11-20 (lightweight, customizable browser) Released

A new version of K-Meleon Portable has been released. K-Meleon is a fast, customizable, lightweight web browser based on the Gecko layout engine developed by Mozilla which is also used by Firefox. It's packaged in PortableApps.com Format so it can easily integrate with the PortableApps.com Platform. And it's open source and completely free.

Update automatically or install from the portable app store in the PortableApps.com Platform.

New article matched for in your Blogger! rule

Testing Wide Production 2020

zondag 21 november 2021

yEd - Diagrammen maken

Voor het aanschouwelijk maken van ingewikkelde verbanden, zijn diagrammen vaak een onmisbaar hulpmiddel. Je zou ze in een gewoon tekenprogramma kunnen maken, maar dan is het aanbrengen van wijzigingen een heidens karwei. Nee, een gespecialiseerd product werkt aanzienlijk beter, en yEd is zo'n product. Het bevat bouwstenen voor allerlei soorten diagrammen van stroomschema's tot stambomen en kan elementen die je toevoegt met één druk op de knop zelf in het gelid plaatsen. In complexe diagrammen kun je delen groeperen en deze in- en uitklappen, en yEd kan data zelf op allerlei manieren manipuleren.

yEd kun je hier downloaden.

New article matched for in your Blogger! rule

Testing Wide Production 2020

woensdag 17 november 2021

Christoph Berg: PostgreSQL and Undelete

pg_dirtyread

Earlier this week, I updated pg_dirtyread to work with PostgreSQL 14. pg_dirtyread is a PostgreSQL extension that allows reading "dead" rows from tables, i.e. rows that have already been deleted, or updated. Of course that works only if the table has not been cleaned-up yet by a VACUUM command or autovacuum, which is PostgreSQL's garbage collection machinery.

Here's an example of pg_dirtyread in action:

# create table foo (id int, t text);   CREATE TABLE   # insert into foo values (1, 'Doc1');   INSERT 0 1   # insert into foo values (2, 'Doc2');   INSERT 0 1   # insert into foo values (3, 'Doc3');   INSERT 0 1      # select * from foo;    id │  t   ────┼──────     1 │ Doc1     2 │ Doc2     3 │ Doc3   (3 rows)      # delete from foo where id < 3;   DELETE 2      # select * from foo;    id │  t   ────┼──────     3 │ Doc3   (1 row)   

Oops! The first two documents have disappeared.

Now let's use pg_dirtyread to look at the table:

# create extension pg_dirtyread;   CREATE EXTENSION      # select * from pg_dirtyread('foo') t(id int, t text);    id │  t   ────┼──────     1 │ Doc1     2 │ Doc2     3 │ Doc3   

All three documents are still there, just now all of them are visible.

pg_dirtyread can also show PostgreSQL's system colums with the row location and visibility information. For the first two documents, xmax is set, which means the row has been deleted:

# select * from pg_dirtyread('foo') t(ctid tid, xmin xid, xmax xid, id int, t text);    ctid  │ xmin │ xmax │ id │  t   ───────┼──────┼──────┼────┼──────    (0,1) │ 1577 │ 1580 │  1 │ Doc1    (0,2) │ 1578 │ 1580 │  2 │ Doc2    (0,3) │ 1579 │    0 │  3 │ Doc3   (3 rows)   

I always had plans to extend pg_dirtyread to include some "undelete" command to make deleted rows reappear, but never got around to trying that. But rows can already be restored by using the output of pg_dirtyread itself:

# insert into foo select * from pg_dirtyread('foo') t(id int, t text) where id = 1;   

This is not a true "undelete", though - it just inserts new rows from the data read from the table.

pg_surgery

Enter pg_surgery, which is a new PostgreSQL extension supplied with PostgreSQL 14. It contains two functions to "perform surgery on a damaged relation". As a side-effect, they can also make delete tuples reappear.

As I discovered now, one of the functions, heap_force_freeze(), works nicely with pg_dirtyread. It takes a list of ctids (row locations) that it marks "frozen", but at the same time as "not deleted".

Let's apply it to our test table, using the ctids that pg_dirtyread can read:

# create extension pg_surgery;   CREATE EXTENSION      # select heap_force_freeze('foo', array_agg(ctid))       from pg_dirtyread('foo') t(ctid tid, xmin xid, xmax xid, id int, t text) where id = 1;    heap_force_freeze   ───────────────────      (1 row)   

Et voilà, our deleted document is back:

# select * from foo;    id │  t   ────┼──────     1 │ Doc1     3 │ Doc3   (2 rows)      # select * from pg_dirtyread('foo') t(ctid tid, xmin xid, xmax xid, id int, t text);    ctid  │ xmin │ xmax │ id │  t   ───────┼──────┼──────┼────┼──────    (0,1) │    2 │    0 │  1 │ Doc1    (0,2) │ 1578 │ 1580 │  2 │ Doc2    (0,3) │ 1579 │    0 │  3 │ Doc3   (3 rows)   

Disclaimer

Most importantly, none of the above methods will work if the data you just deleted has already been purged by VACUUM or autovacuum. These actively zero out reclaimed space. Restore from backup to get your data back.

Since both pg_dirtyread and pg_surgery operate outside the normal PostgreSQL MVCC machinery, it's easy to create corrupt data using them. This includes duplicated rows, duplicated primary key values, indexes being out of sync with tables, broken foreign key constraints, and others. You have been warned.

pg_dirtyread does not work (yet) if the deleted rows contain any toasted values. Possible other approaches include using pageinspect and pg_filedump to retrieve the ctids of deleted rows.

Please make sure you have working backups and don't need any of the above.

New article matched for in your Blogger! rule

Testing Wide Production 2020

dinsdag 16 november 2021

PostgreSQL on WSL2 for Windows: Install and setup

This post explains how to install PostgreSQL on WSL2 for Windows, apply the necessary changes to PostgreSQL settings, and access the database from the Windows host. Even though this knowledge can be found in different bits and pieces spread out all over the internet, I want to compile a short and straightforward how-to article. I want you to be able to complete all the steps from scratch, without having to skip all over the place.

Why do I need PostgreSQL on WSL2?

Even though there is a strong feeling that a true programmer uses Linux in their work, this statement is not really close to the truth. At least, according to this Stack Overflow survey 2021:

What is the primary operating system in which you work?

There are a ton of reasons why a developer might want to use WSL2 with PostgreSQL onboard, but let's name a few:

  • psql is the standard tool for learning and working with PostgreSQL. However, there are some limiting issues under Windows, e.g., the lack of tab completion, issues with encoding, etc. Running psql under WSL2 will provide you with a smoother experience.
  • It's a good idea to test and debug your application in a remote environment rather than on a local host. That way, you can immediately find issues with client authentication, or with connection settings. Since WSL2 is a standalone virtual machine under the hood, using it might be the easiest way to achieve this.
  • WSL2 will provide the environment for advanced developers to build and test different PostgreSQL extensions not available in binary form or created exclusively for Linux, e.g., pg_squeeze, pg_show_plans, pg_crash, pg_partman, etc.

Install WSL2

To install WSL2 from PowerShell or the Windows Command Prompt, just run:

     PS> wsl --install     

From the manual:

  • This command will enable the required optional components, download the latest Linux kernel, set WSL2 as your default, and install a Ubuntu distribution for you by default.
  • The first time you launch a newly installed Linux distribution, a console window will open and you'll be asked to wait for files to de-compress and be stored on your machine. All future launches should take less than a second.

Supposing you prefer to change the distribution installed, you have the option to choose among those available. To list the known distros, run:

     PS> wsl --list --online     The following is a list of valid distributions that can be installed.     Install using 'wsl --install -d <Distro>'.          NAME            FRIENDLY NAME     Ubuntu          Ubuntu     Debian          Debian GNU/Linux     kali-linux      Kali Linux Rolling     openSUSE-42     openSUSE Leap 42     SLES-12         SUSE Linux Enterprise Server v12     Ubuntu-16.04    Ubuntu 16.04 LTS     Ubuntu-18.04    Ubuntu 18.04 LTS     Ubuntu-20.04    Ubuntu 20.04 LTS     

After that, you can install the chosen Linux distribution on WSL2 by running the command:

     PS> wsl --install -d Debian     

Here in this post, I will use the Ubuntu distribution for demonstration purposes.

⚠ All further commands are supposed to be executed in the Ubuntu WSL2 session.

I strongly suggest using Windows Terminal to work with console sessions.

Install PostgreSQL on WSL2 Ubuntu

Please follow the instructions on the official site:

     $ sudo sh -c 'echo "deb http://apt.postgresql.org/pub/repos/apt $(lsb_release -cs)-pgdg main" > /etc/apt/sources.list.d/pgdg.list'          $ wget --quiet -O - https://www.postgresql.org/media/keys/ACCC4CF8.asc | sudo apt-key add -          $ sudo apt-get update          $ sudo apt-get -y install postgresql postgresql-contrib          $ psql --version     psql (PostgreSQL) 14.0 (Ubuntu 14.0-1.pgdg20.04+1)          $ sudo service postgresql status     14/main (port 5432): down          $ sudo service postgresql start      * Starting PostgreSQL 14 database server     

Please take note: we are not using systemctl because WSL2 doesn't use systemd to operate:

     $ sudo systemctl status postgresql     System has not been booted with systemd as init system (PID 1). Can't operate.     Failed to connect to bus: Host is down     

Set up PostgreSQL on WSL2

Now we need to set up PostgreSQL so it will:

  • accept connections from the Windows host;
  • have custom-created users;
  • allow authentication from remote hosts.

By the way, let me recommend my friend Lætitia Avrot's blog to you, where all these topics are covered.

How do I accept connections from the Windows host for PostgreSQL on WSL2?

🔔 I'm aware that the newest WSL2 version allows localhost forwarding, but I think this topic is essential to know, especially in constructing a development environment!

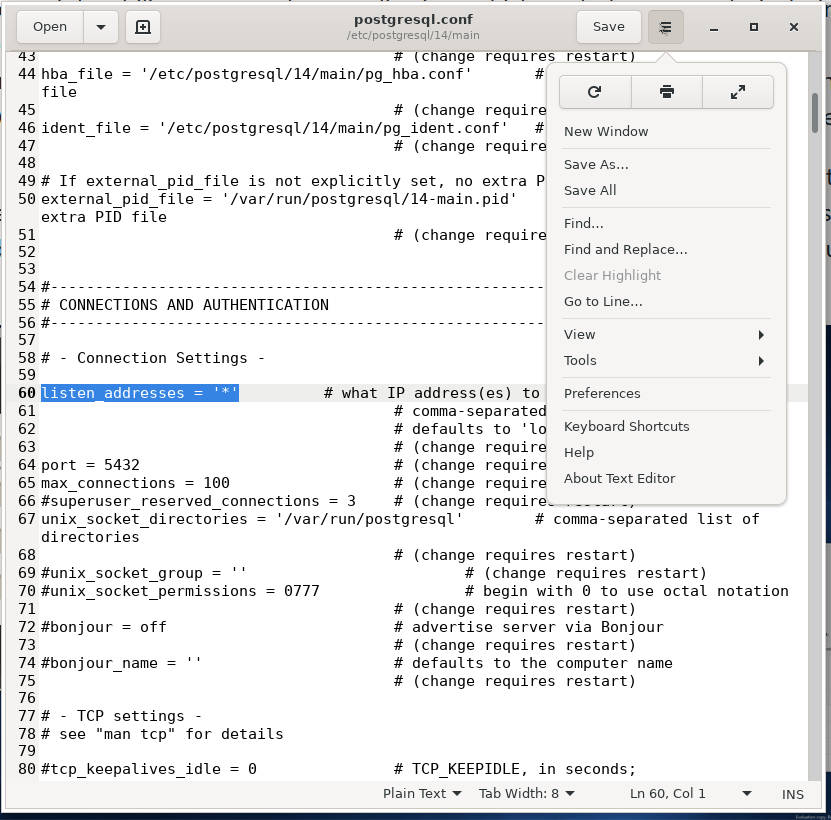
By default, every PostgreSQL installation listens on 127.0.0.1 only. That means you cannot access the database instance from a remote host, including the Windows host. This is not a bug. This is a security feature.

To change this setting, we need to:

  1. edit postgresql.conf;
  2. uncomment (sic!) listen_address line;
  3. change it to listen_address = '*' for every available IP address or comma-separated list of addresses;
  4. restart the PostgreSQL instance, so the new settings take effect.

Depending on your distro, the location of the postgresql.conf file may differ. The easiest way to know where it is is to ask the server itself. However, there is one catch here.

Right now, there is only one user available in our fresh PostgreSQL installation: postgres. And there is only one way to connect to the instance: peer authentication.

That means the operating system (Ubuntu on WSL2) should provide a user name from the kernel and use it as the allowed database user name:

     sudo -u postgres psql -c 'SHOW config_file'                    config_file     -----------------------------------------      /etc/postgresql/14/main/postgresql.conf     (1 row)     

🔔 If you are struggling to understand what this command does, I suggest you visit the fantastic explainshell.com site!

Now let's do something fun! The latest WSL2 is so cool that it allows you to run GUI Linux applications! So instead of using a TUI editor like nano or vim, we will use Gedit!

     $ sudo apt install gedit -y          $ sudo gedit /etc/postgresql/14/main/postgresql.conf          $ sudo service postgresql restart     

postgresql.conf in gedit (Ubuntu-20.04 on WSL2)

How do I add users to a PostgreSQL cluster?

As I said, by default, there is only one user available: postgres . I strongly recommend creating a separate user.

Here we will use the same trick to connect to PostgreSQL with psql, and execute the CREATE USER command:

     $ sudo -u postgres psql     psql (14.0 (Ubuntu 14.0-1.pgdg20.04+1))     Type "help" for help.          postgres=# CREATE USER dev PASSWORD 'strongone' CREATEDB;     CREATE ROLE     postgres=# \q     

Now we can specify our newly created user dev and connect to PostgreSQL using password authentication. Please note that I explicitly used the -h 127.0.0.1 parameter to force password authentication instead of peer authentication.

     $ psql -U dev -h 127.0.0.1 -d postgres     Password for user dev:     psql (14.0 (Ubuntu 14.0-1.pgdg20.04+1))     SSL connection (protocol: TLSv1.3, cipher: TLS_AES_256_GCM_SHA384, bits: 256, compression: off)     Type "help" for help.          postgres=>\q     

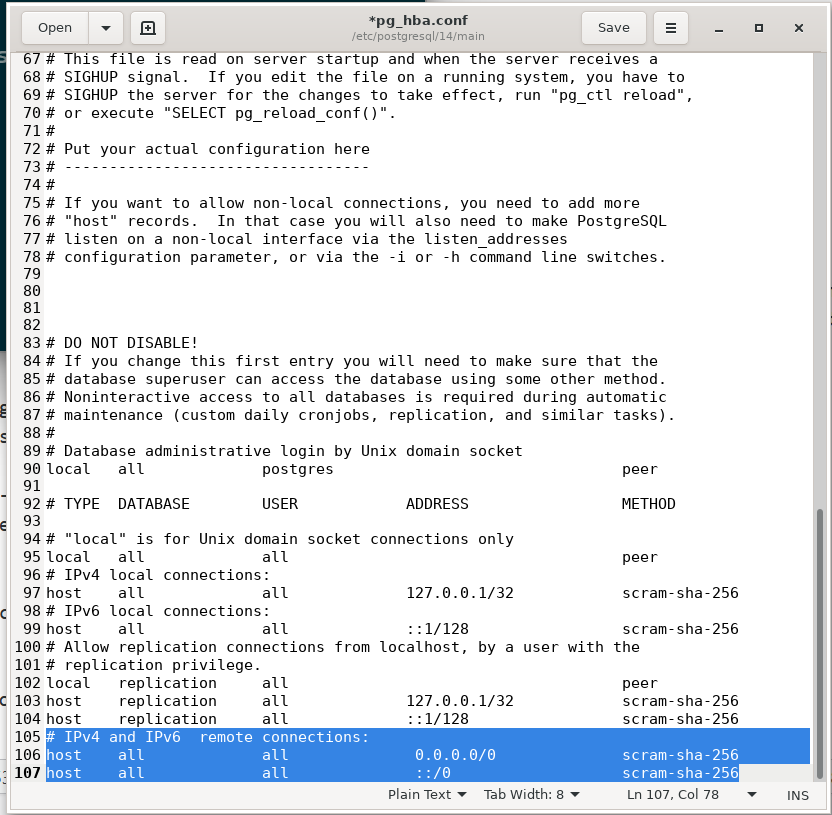
How can I allow authentication from remote hosts for PostgreSQL on WSL2?

The easiest way would be to add additional lines to the pg_hba.conf file:

     ..     host    all             all              0.0.0.0/0                       scram-sha-256     host    all             all              ::/0                            scram-sha-256     

This change will apply scram-sha-256 password authentication for all IPv4 and IPv6 connections.

     $ sudo -u postgres psql -c 'SHOW hba_file'                   hba_file     -------------------------------------      /etc/postgresql/14/main/pg_hba.conf     (1 row)          $ sudo gedit /etc/postgresql/14/main/pg_hba.conf          $ sudo service postgresql restart     

pg_hba.conf in gedit (Ubuntu-20.04 on WSL2)

How do I connect to PostgreSQL on WSL2 from a Windows host?

With the latest WSL2 version, you can access PostgreSQL from a Windows app (like psql or pgAdmin) using localhost (just like you usually would):

     PS> psql -U dev -d postgres     Password for user dev:     psql (13.0, server 14.0 (Ubuntu 14.0-1.pgdg20.04+1))     WARNING: psql major version 13, server major version 14.              Some psql features might not work.     WARNING: Console code page (65001) differs from Windows code page (1251)              8-bit characters might not work correctly. See psql reference              page "Notes for Windows users" for details.     SSL connection (protocol: TLSv1.3, cipher: TLS_AES_256_GCM_SHA384, bits: 256, compression: off)     Type "help" for help.          postgres=>\q     

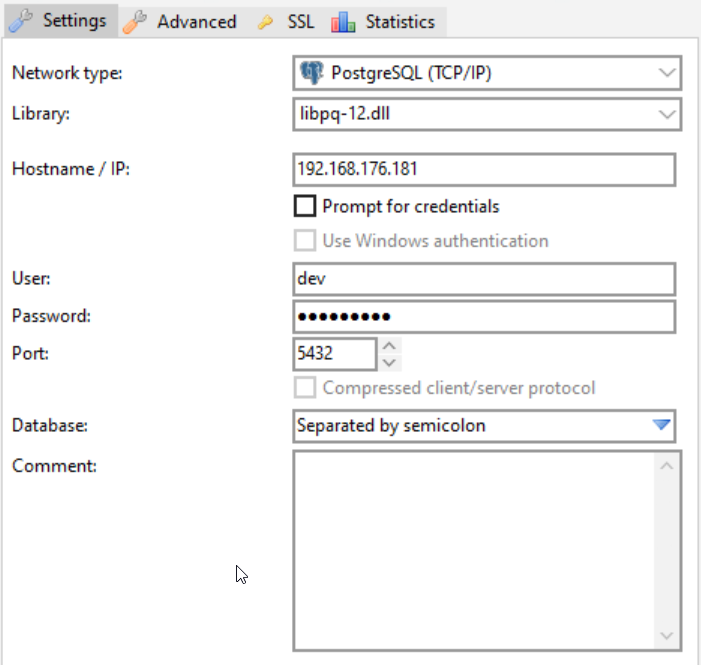
⚠ But if you have conflicts with, for example, a local (Windows) PostgreSQL installation, you might want to use the specific WSL2 IP address. The same applies if you are running an older version of Windows (Build 18945 or less).

As I mentioned earlier, the WSL2 system is a standalone virtual machine with its own IP address. So first, we need to know the IP address to connect. There are several ways to do so. Choose whatever you prefer.

You can run such a command in the WSL2 session:

     $ ip addr show eth0     6: eth0: <BROADCAST,MULTICAST,UP,LOWER_UP> mtu 1500 qdisc mq state UP group default qlen 1000         link/ether 00:15:5d:19:85:ca brd ff:ff:ff:ff:ff:ff         inet 192.168.176.181/20 brd 192.168.191.255 scope global eth0            valid_lft forever preferred_lft forever         inet6 fe80::215:5dff:fe19:85ca/64 scope link            valid_lft forever preferred_lft forever     

Or even shorter– if you don't need all those details:

     $ hostname -I     192.168.176.181     

Or, you can run one of these commands from PowerShell, or from the Command Prompt session in the Windows host:

     PS> bash -c "hostname -I"     192.168.176.181          PS> wsl -- hostname -I     192.168.176.181     

Now that we know the IP address, we can connect to PostgreSQL on WSL2 with psql:

     PS> psql -U dev -d postgres -h 192.168.176.181     Password for user dev:     psql (13.0, server 14.0 (Ubuntu 14.0-1.pgdg20.04+1))     WARNING: psql major version 13, server major version 14.              Some psql features might not work.     WARNING: Console code page (65001) differs from Windows code page (1251)              8-bit characters might not work correctly. See psql reference              page "Notes for Windows users" for details.     SSL connection (protocol: TLSv1.3, cipher: TLS_AES_256_GCM_SHA384, bits: 256, compression: off)     Type "help" for help.          postgres=> \q     

Or connect with any GUI you prefer, for example, with HeidiSQL:
HeidiSQL - Session Manager

The only drawback is that the WSL2 machine IP address cannot be made static! That means you will need to check the IP address after each restart or set up some startup script to update the system environment variable of some file content with the current IP. Since there is no universal solution, I will leave that as homework for the reader. 😉

Conclusion

In this post, we learned:

  • how to install WSL2;
  • the way to install PostgreSQL on the default WSL2 distro Ubuntu;
  • how to set up PostgreSQL to listen on all IP addresses;
  • how to set up PostgreSQL to authenticate users from all IP addresses;
  • some tricks, software, and services.

Let me know if this topic is interesting for you and the issues we should highlight in the follow-up articles.

Here's where you can find more Windows-specific posts you may find helpful.

In conclusion, I wish you all the best! ♥
Please, stay safe – so we can meet in person at one of the conferences, meetups, or training sessions!

The post PostgreSQL on WSL2 for Windows: Install and setup appeared first on CYBERTEC.

New article matched for in your Blogger! rule

Testing Wide Production 2020

zaterdag 13 november 2021

Nieuwe tv kopen op Black Friday? Op deze specs moet je goed letten

?appId=21791a8992982cd8da851550a453bd7f&

Als je een nieuwe televisie gaat kopen heb je tegenwoordige veel keuze. Vooral het type scherm dat je aanschaft kan veel verschil uitmaken. Hieronder zetten we huidige technische termen helder voor je uiteen.

New article matched for in your Blogger! rule

Testing Wide Production 2020

woensdag 10 november 2021

Frits Hoogland: Postgres pgagroal connectionpool

894104.png

This blogpost is about a connectionpool that is lesser known than pgbouncer, which is pgagroal. Both are socalled 'external connectionpools', which mean they can serve application/user connections but are not part of an application.

They also serve the same function, which is to serve as a proxy between clients and applications on one side, and to a postgres instance on the other side. In that position, the first obvious advantage is that it can perform as an edge service, concentrating connections from one network, and proxy the requests to the database in a non-exposed network.

Another advantage is that the client/application side connections are decoupled from the database side connections, and therefore can serve badly behaving applications (which create and destroy connections to a database repeatedly) by linking the database connection request to an already setup database connection, instead of initializing and destroying a connection.

CentOS/RHEL/Alma/Rocky/enz. 8 only

Pgagroal is EL version 8 only, because its build scripts check minimal required versions. When you try to build pgagroal on CentOS 7, it will error with the message:

CMake Error at CMakeLists.txt:1 (cmake_minimum_required):      CMake 3.14.0 or higher is required.  You are running version 2.8.12.2    

'EL' is a general naming for all Linux distributions that take RedHat's Enterprise distribution as a basis.

Installation

However, when you are on EL version 8, you can use the postgres yum repository to install pgagroal in a very simple way. There is no need to download the source and compile it yourself.

  1. Add the EL 8 postgres yum repositories:

    sudo dnf install -y https://download.postgresql.org/pub/repos/yum/reporpms/EL-8-x86_64/pgdg-redhat-repo-latest.noarch.rpm    
  2. Install pgagroal:

    sudo dnf -y install pgagroal    
  3. Add the pgagroal user:

    sudo useradd pgagroal    

Now you're set, and can use the pgagroal by starting pgagroal via systemd: sudo systemctl start pgagroal.

Configuration: autostart

By default, pgagroal adds a systemd unit file, but does not enable it (so it gets started during startup), and does not start it. If you want pgagroal to be started by systemd automatically, you must enable the systemctl unit: sudo systemctl enable pgagroal.

Configuration: listen configuration

In order to be defensive and careful, pgagroal by default listens at localhost, at port 2345, which is the reverse of the postgres default port 5432. If you want to use pgagroal as a connection pool in front of an instance of postgres, you probably should change the host and maybe the port settings in the /etc/pgagroal/pgagroal.conf file in the section [pgagroal], so that the clients can reach and communicate with pgagroal at the set host:port combination.

Configuration: server section

To specify where pgagroal needs to connect to, there is a section called [primary] in the /etc/pgagroal/pgagroal.conf file, which allows you to set host and port.

This is where pgagroal is fundamentally different from pgbouncer: pgbouncer allows you to specify multiple databases on multiple machines (see 'section [databases]'), pgagraol allows you to specify a single primary server.

Configuration: pgagroal_hba.conf

Just like postgres, pgagroal can perform host based authentication using its own hba.conf file in /etc/pgagroal, called /etc/pgagroal/pgagraol_hba.conf, which has the same fields as a normal postgres hba.conf file (type, database, user, address, method). By default it performs no authentication.

Configuration: pgagroal_databases.conf

For the configured postgres instance at the host and port number set in the /etc/pgagroal/pgagroal.conf file in the [primary] section, pgagroal can be configured to apply limits for a database, a user or both. The limit is the number of connections for a database, user or database and user combination.

A number of initial connections (so connections created before an application or user request for it) can also be set, but for that a user definition must be created, so pgagroal can use that username and password to authenticate and build a pool of connections.

Configuration: pipeline

Another really important configuration setting in /etc/pgagroal/pgagroal.conf is pipeline. The setting of pipeline defines how a connection is managed by pgagroal. The default value is 'auto', which makes pgagroal choose the pipeline setting based on the configuration.

The most minimal and therefore fastest implementation is 'performance'. This setting does not support transport layer security, and binds a client connection to a database connection for the duration of the session.

The next pipeline configuration option is 'session', which, quite obviously binds a client connection to a database connection for the duration of the session too, but supports all configuration options.

The last pipeline configuration option is 'transaction'. This is a special configuration, because it binds a client to a database connection for the duration of a transaction.

This has the wonderful property that you can have a socalled 'asynchronous connection count', which means that you can have (much) more client connections than having database connections. In other words: this is a potential solution for the often excessively oversized application connection pools.

But there is a huge caveat: because the dynamic transactional binding of clients with database connections, you cannot have any construction used by a client that sets and depends on a server side setting or configuration. This means concretely things like 'SET', 'LISTEN', 'WITH HOLD CURSOR' and 'PREPARE' and 'DEALLOCATE' cannot be used.

Configuration: metrics

A feature that is not present in pgbouncer is the ability to expose runtime statistics in prometheus format, which means statistics can be scraped by a prometheus server.

Conclusion

I cannot come to a definite verdict between pgbouncer and pgagroal. There are reports of issues with pgbouncer in the past, for which I don't know the current state. Pgbouncer configuration feels and seems much less straightforward than pgagroal configuration.

But pgbouncer can serve as a proxy to multiple machines, while pgagraol is limited to one. Pgagroal advertises the explicit design for performance, which I have not tested, while pgbouncer seems to be more generalistic.

New article matched for in your Blogger! rule

Testing Wide Production 2020

dinsdag 9 november 2021

Notebooks, Visual Studio Code style

opengraph-blog.png

Read the full article

New article matched for in your Blogger! rule

Testing Wide Production 2020